When I reflect back to early versions of iOS and the workarounds that teachers and students used to have to jump through hoops to complete through third-party applications, the iOS operating system has come a very long way from where it used to be. No longer do you have to mirror your iPad to record your screen. No longer do you have to go through lengthy processes or use additional hardware to do things like split screen or drag and drop. In this post, I’ll share ten of what I think are the most important things educators should think about in order to make the most of their iPad using iOS 11…
1. Control Centre Customisation
The control centre of your iPad is the hub of shortcuts that can help to make your life easier. To access your control centre, simply swipe up from the bottom of your screen to be presented with this view:

The area that I’ve highlighted is where all of your different shortcuts to different activities can be found. You can customise these options by going to:
Settings >> Control Centre >> Customise Controls
From here you can add or remove the various features you’d like to add such as those you can see in my selection. I think that the best feature you can add to the Control Centre is the screen recording option. It can be used to record anything on your screen, such as the short video below:
2. Take and annotate screenshots
As you’ll have seen in the video above, taking screenshots and annotating them is super easy on an iPad and it’s a really useful tool. Markup is available in lots of apps now including the iWorks apps of Pages, Numbers and Keynote. Simply pressing your home button and power button together will take the screenshot. When you do that, now in iOS 11 it will place a thumbnail of your screenshot in the corner of your screen. To annotate that image (or series of screenshots if you have taken a few) simply tap on the thumbnail and the markup screen will appear.

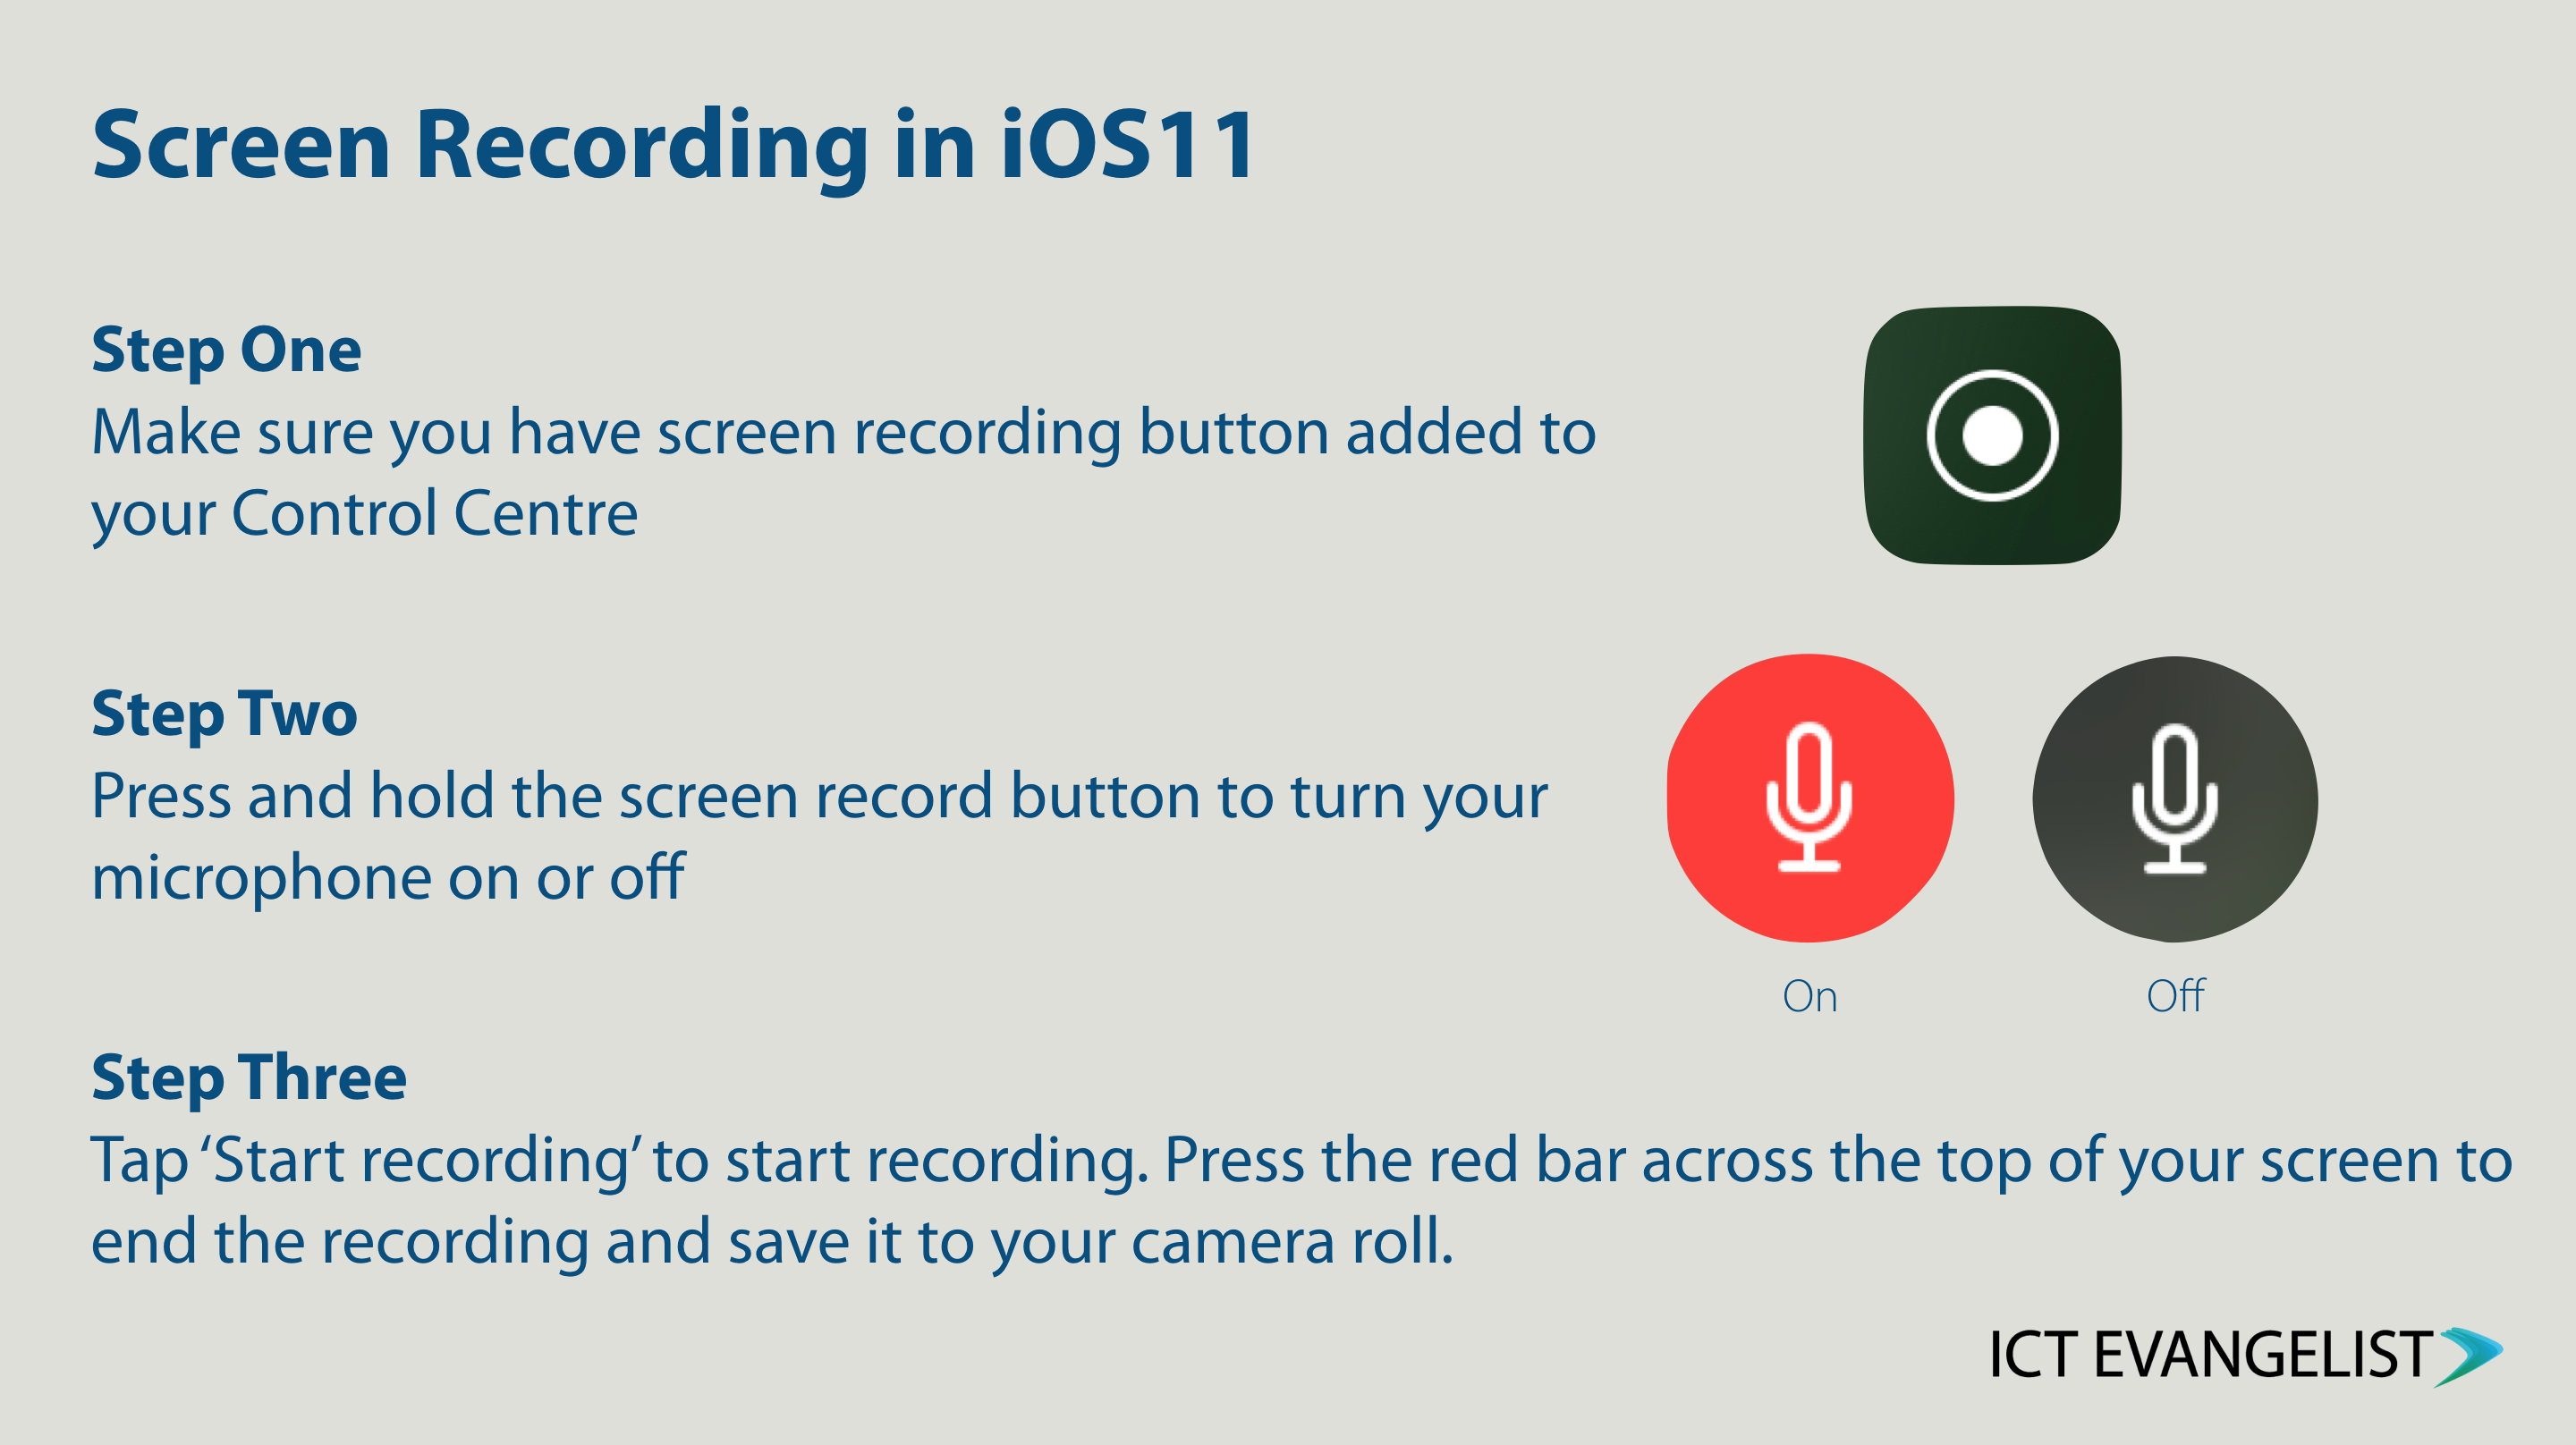
3. Screen recording
As someone who regularly has to make videos explaining how to undertake different tasks with devices, screen recording is something which has been a staple of my toolkit for a long time. It has always been a source of frustration that it was never a particularly easy undertaking to record actions on an iPad screen…. until now! Screen recording can be added to your control centre as an option through the Control Centre Customisations as mentioned above.
To record your screen, simply swipe up from the bottom as usual to access your Control Centre. Then simply tap on to the screen recording icon.
4. Make your own music in GarageBand
Making music isn’t everyone’s cup of tea but when making digital artefacts, it’s nice to be able to easily have something to hand which you can use as background music where you don’t have to worry about where it has come from. Using ‘Live Loops’ in GarageBand for iPad, making music is simple. Check out my short video below to see how you can create your own music, name it and share it for use in other apps such as iMovie. By the way, guess how I made the video… you’ve got it – I screen recorded it!
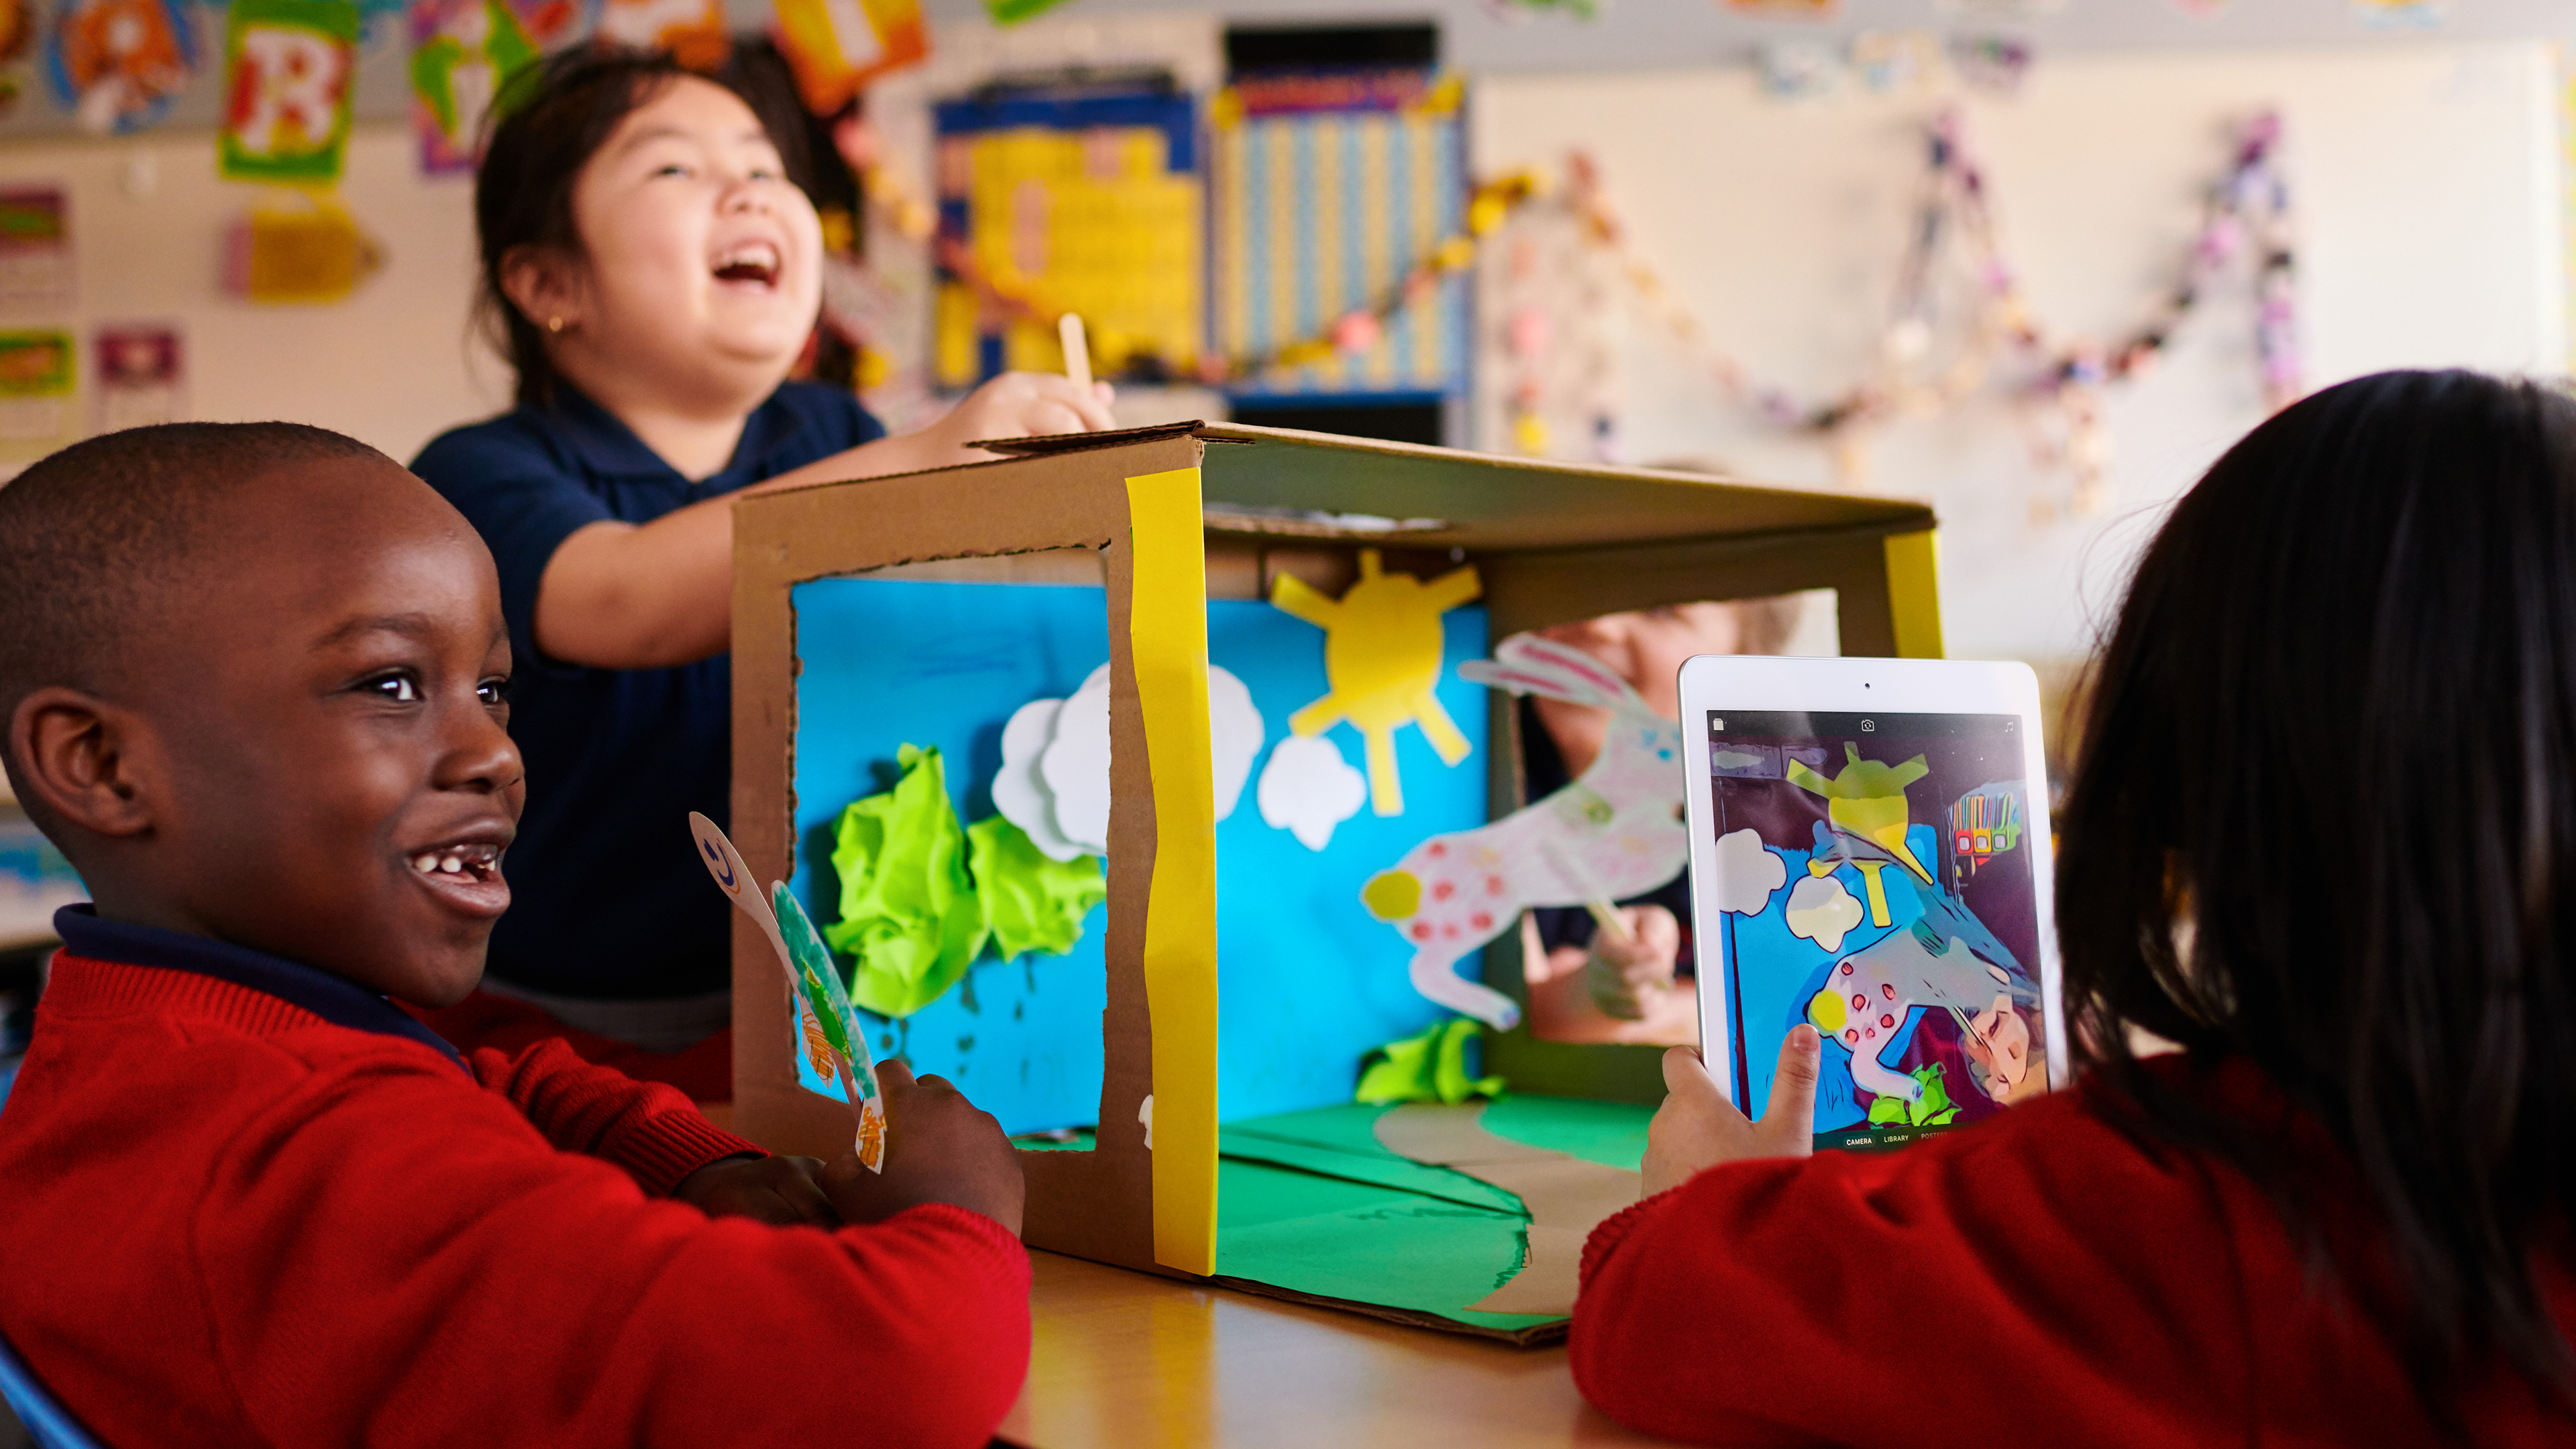
5. Use AR in the classroom
iOS11 came bundled with something that we as users can’t really use ourselves, but developers can make huge use of. It’s called ‘ARKit’ and with it, developers have been busy beavering away creating some of the best Augmented Reality apps in the world, all available to use in iOS on your iPad. So whilst you might not be easily able to create your own AR apps, you can certainly make use of the innovative apps that have been and still are being developed.
Lots of these apps were showcased in the recent periodic table of iOS apps for AR and VR that I created with Steve Bambury.
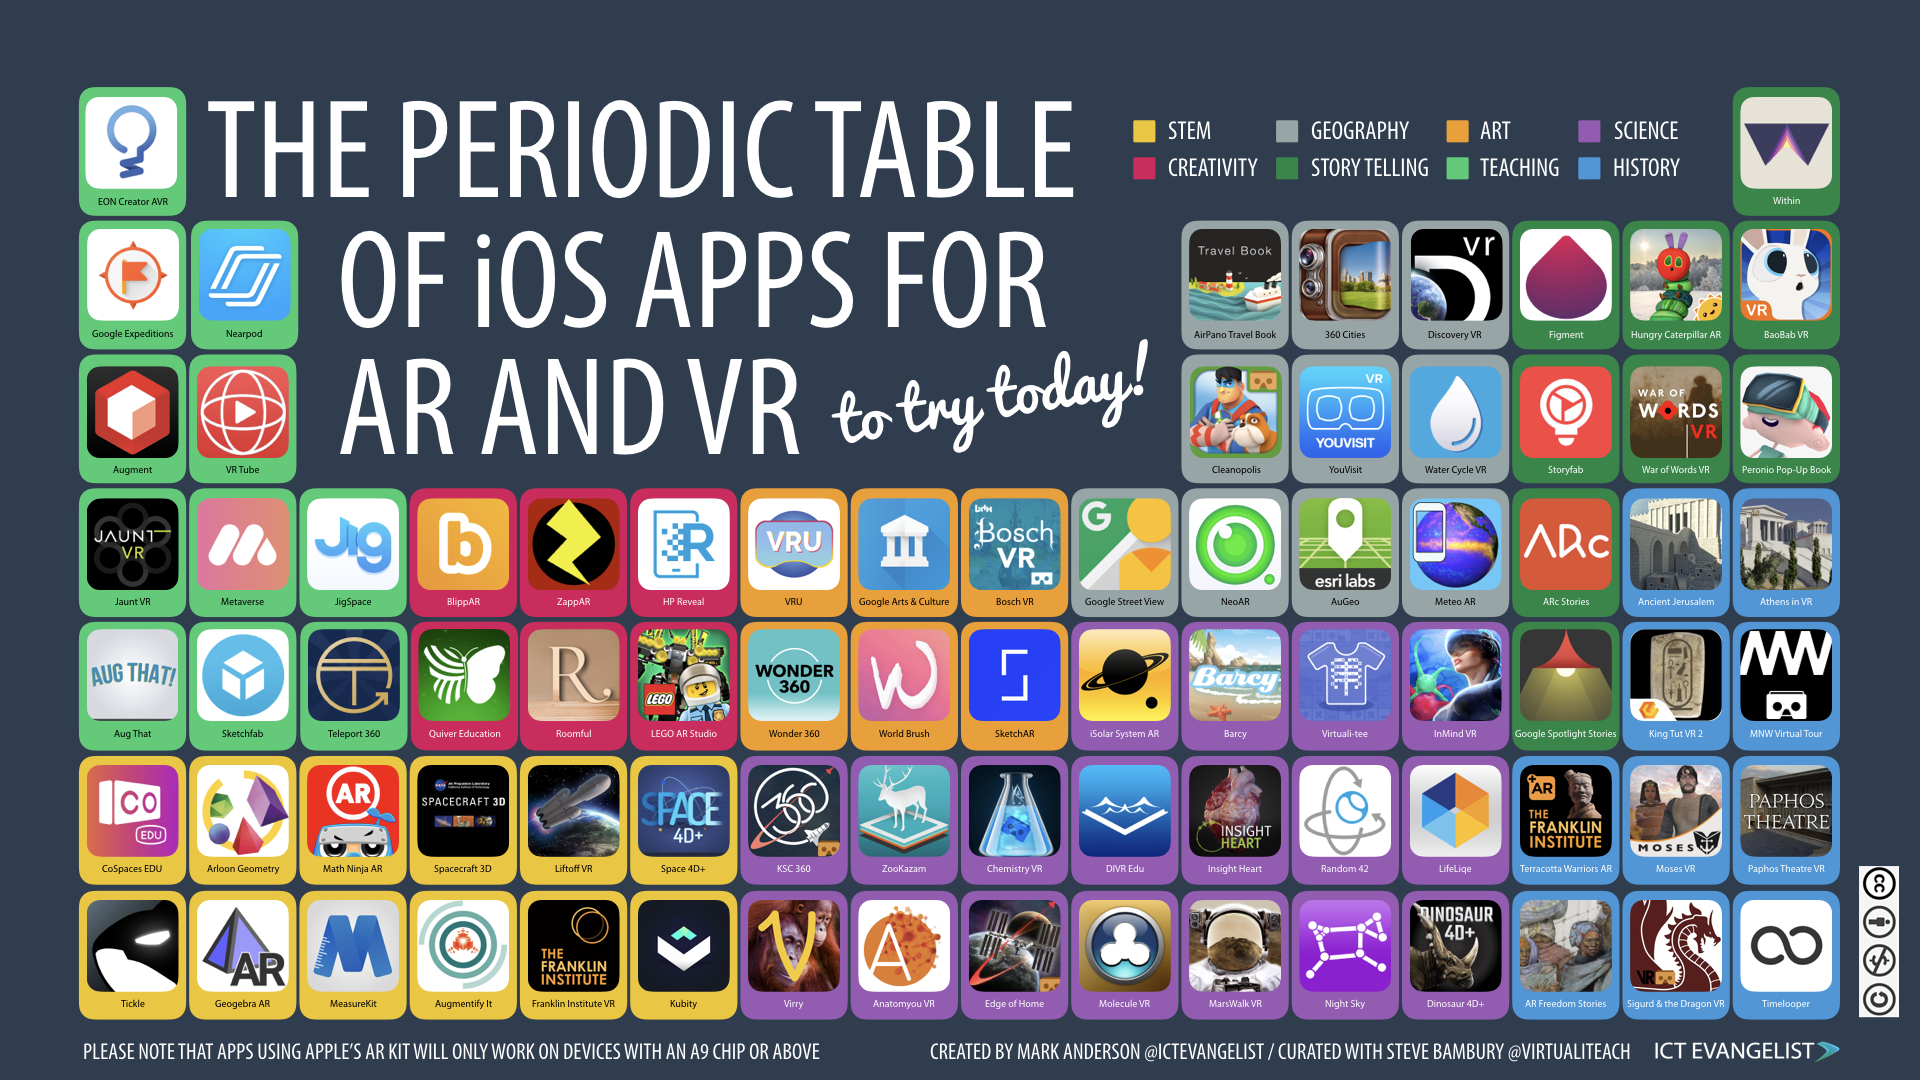
Rather than go through each of the different apps, why not have a look at a few of them. Perhaps try Metaverse to create your own interactive AR quiz for AFL and share it with your learners. The app can be downloaded here and you can create your own AR experiences in Metaverse by visiting here. Whichever way you look at it, using AR in the classroom gives us opportunities to help learners learn and experience new things in ways which wouldn’t be possible without the technology. It is well worth a look! For an interactive version of the table above with links to each of the apps, visit my interactive ThingLink of the table above here.
6. Use Apple Clips
A free app, Clips is such a simple way to share ideas and communicate learning. Its simplicity and ease of use mean it is perfect for learners of all ages to use in the classroom.
Whether it’s Year 6 learning about Roman Numerals….
Y6's first attempt at using Clips in an inquiry based approach within a fact based curriculum #edtech #ukedchat #ClassroomClips pic.twitter.com/P0JKiW7eqo
— Joe Blaney (@joe_blaney) September 19, 2017
Or an innovative educator like Eoin Hughes using Apple Clips to show how he made ‘Billie Jean’ in GarageBand on his iPad…
How to play “Billie Jean” with #GarageBand on @AppleEDU #iPad
Because, #EveryoneCanCreate
📱🎧😅🥁🎸🎹 #AppleEDUChat pic.twitter.com/WrYuh5L1ZN— Eoin Hughes (@_ehughes_) April 5, 2018
Apple’s Clips app definitely has a place in the iPad educator’s toolkit. Check out this post to discover more ideas on how you could use Apple Clips in the classroom. Also check out the hashtag #ClassroomClips on Twitter with educators sharing how they’re using it too and finally, visit your Apple Teacher account where you can learn how to use Apple Clips and all of its features.

7. Use mirroring
Mirroring is the process by which you can wirelessly project the screen you have on your device to another device, normally to a projector to aid ease of sharing something on your device or for other demonstration purposes. One of the most well documented pieces of research about good use of edtech is that around the use of visualisers.
Using mirroring means you can easily use your iPad as a visualiser. With tools such as the Apple Pencil and markup options in lots of apps to live mark or annotate work on the screen to the whole class it is easy to use your iPad in this way. Additionally, by handing the device over to the student, or if they mirror themselves, you can easily create effective learning discussions around open peer feedback. There are lots of reasons why this is good practice. Sharing student work publicly to the screen means they have an automatic audience which gives learners agency and authenticity. Discussing learning publicly with the class aides learner metacognition and their self-regulation, both of which score highly in Hattie’s effect scores for impactful learning, and in the EEF’s Teaching and Learning toolkit. As they say…
Metacognition and self-regulation approaches aim to help pupils think about their own learning more explicitly, often by teaching them specific strategies for planning, monitoring and evaluating their learning. Interventions are usually designed to give pupils a repertoire of strategies to choose from and the skills to select the most suitable strategy for a given learning task.
The EEF have also just launched a great metacognition toolkit which you can find here which links directly to what I’m talking about here. There are so many ways in which learning with technology can help in this regard. Check it out!
There are a number of ways in which you can use the built-in ‘Airplay’ feature of your iPad to mirror your screen to other devices. The most popular methods in schools are to use either AirServer or Reflector, each of which have similar features and prices. Please explore both to see which works best for you in your school. The other option most used by schools is that of an Apple TV which due to its cost often leads to schools choosing the AirServer or Reflector options.
One final thing to consider might be getting yourself an iPad tripod or clamp for your desk so that you can write on it without having to hold it. I was in a discussion about this recently on Twitter and the popular choice was this one from Belkin:
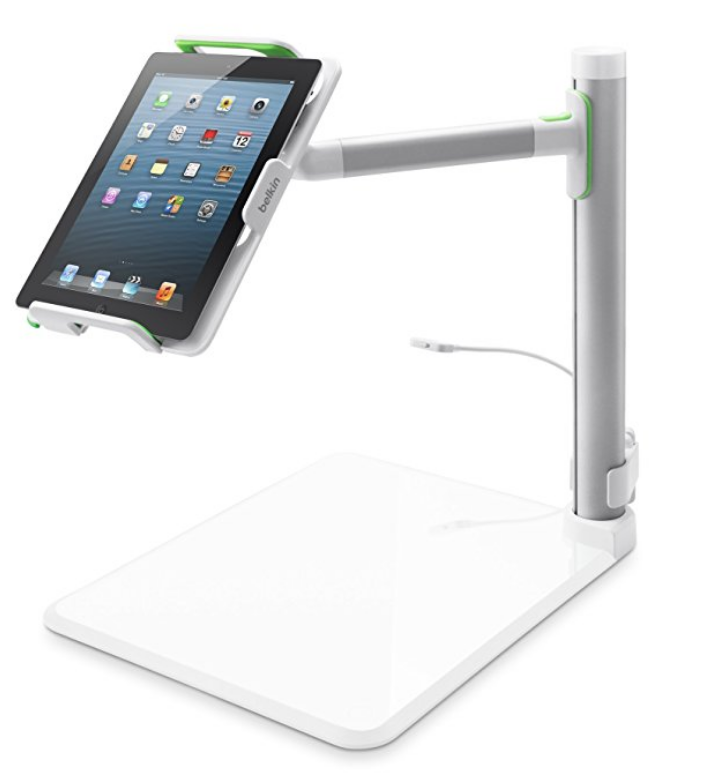
At £125 pounds or so for one of these though you might like to just use a photo and work from that instead, it would definitely be cheaper and there are lots of great apps that will facilitate your markup, even the simple to use free Adobe Acrobat Reader app.
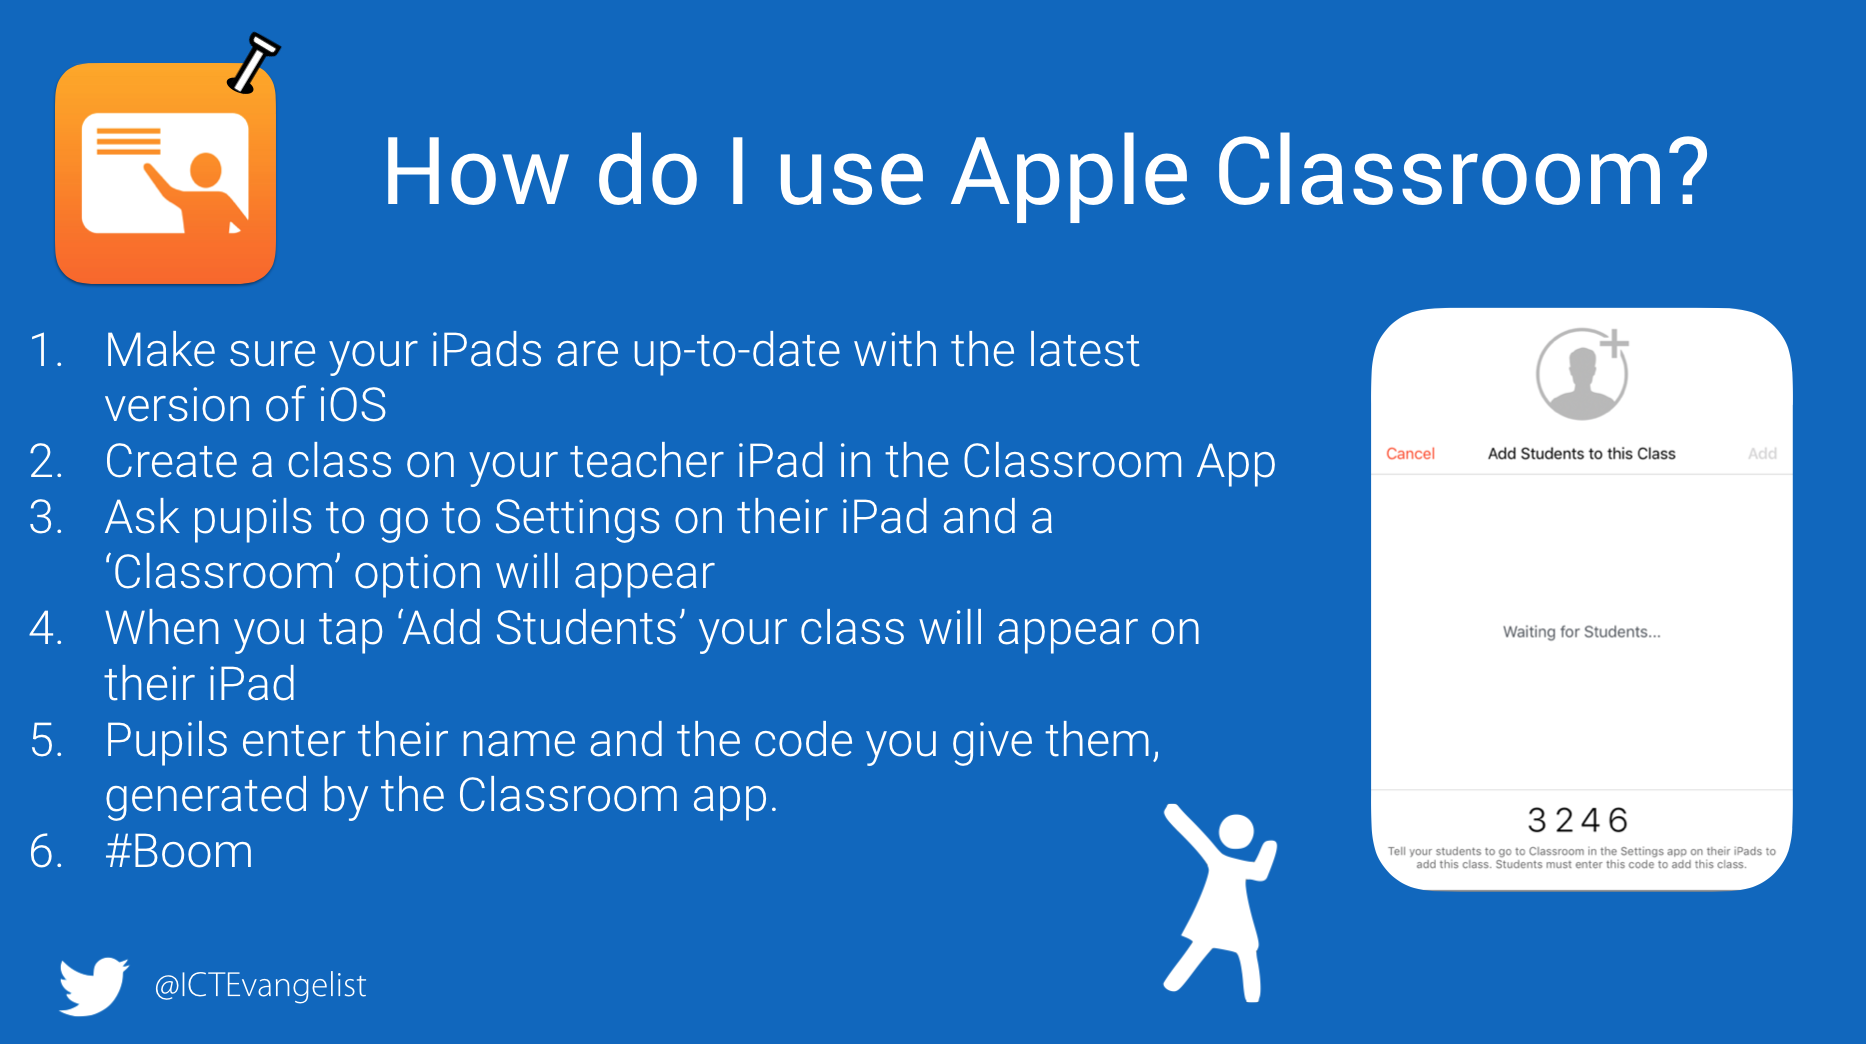
8. Use Apple Classroom
Apple have an app called Classroom which effectively enables you as a teacher to see every child’s device and allows you to:
- share their screens to your screen
- open apps on their device
- lock their screens
- open web pages on their device
- open books in iBooks on their device
- group students together
and much more besides. It’s not like Google Classroom which is a hub for setting, collecting and assessing student work; Apple’s Classroom app is about having an efficient classroom. Some people talk about it as being a behaviour management tool because you can lock screens for example or lock students into a particular app. I don’t see it as a behaviour management tool though, it is far more a classroom management tool. It speeds up processes. No longer do you have to wait 10 minutes while every child either scans a QR code or goes into another app to find a website address; now you can simply make that website, app or lots of other things just open up and appear on their devices. It saves time and enables you as the teacher in the room to make the most of the limited time that you all have together during a learning sequence.
If you’d like to find out more about Apple’s Classroom app, what it can do and how to make it work in your classroom, please check out this post I wrote or visit Apple’s site to find out more.
9. Use the camera
The camera app on the iPad is one of the most powerful tools on the device. I’ve alluded to it above when talking about using the iPad like a visualiser when using mirroring, but the two cameras on the iPad can help with all sorts of things in the classroom, whether it’s:
- taking photos on a school trip to explore on your return
- using the camera to engage with relevant and purposeful AR apps
- using the camera to create 360° images to facilitate VR experiences
- recording science experiments or other learning activities in slo mo, such as in PE, to ease analysis
- take pictures of student work
- take pictures of events
- record videos of performances
the list goes on….
Linked to images and taking photographs or videos, the screenshot feature (you press your home button and standby button together to take a screenshot) is really powerful, and once you add in markup to the mix so you can annotate those screenshots it becomes even more powerful.
10. Everyone can create – #AppleEDUchat
The latest initiative from Apple making use of great ideas and work from the thousands of innovative ADEs from around the world is called ‘Everyone Can Create’. This final element to this mini-guide urges you to think creatively about how you use your iPads in the classroom. The form factor of the device being so mobile with so many awesome features means that you can ask your students to explore learning in so many innovative and creative ways.
Unfortunately, the ‘Everyone Can Create‘ curriculum for subjects across the board doesn’t come live until the Autumn which is a shame given the time when most teachers map out and plan their curriculum for the coming academic year is around about between now and the end of the Summer term. That said, it shouldn’t stop you, if you have iPads in your classroom to think about how you can creatively and effectively use the devices for this purpose in the classroom.
If you’re doing the things listed above such as mirroring, asking students to create content, creating your own soundtracks, you’re using the camera to record things or to use Green Screening with apps such as Doink or LumaFusion to allow students to use their voice in new and interesting ways; chances are you and your learners are already making the most of the device. Every day is a learning day though and keeping on top of all of this is a relatively easy thing to do. Taking control of your own professional development is a great way to be able to pick and choose the learning you undertake so that you get the most out of it. The best way I can suggest to do this is to either participate or view the weekly #AppleEDUchat chat that takes place weekly on Twitter on a Tuesday evening.
Next week’s #AppleEDUChat looks a belter!! Join @Mat6453 and I for an #everyonecancreate themed chat on Tuesday 1st May, 8pm BST pic.twitter.com/8baMXAhnzM
— Gavin Smart (@gavinsmart) April 25, 2018
Interestingly and relevant to this section too, this week’s forthcoming chat will be focussing on creative ways to use your iPad in the classroom so why not get on Twitter this coming Tuesday night and learn more. I’d highly recommend sharing what you’re doing too as I am sure that the inclusive group of educators who take part in the chat would firstly love to hear what you’re doing and also be able to offer similar ideas or ways of improving what you’re already doing. I hope to see you there!
In summary
The list above is not exhaustive because features like drag and drop, split screen and the really helpful ‘File Manager’ app are definitely things you should be using on your iPad in order to get the most out of it. That said though, I do think it’s amazing what can be done just off the back of working with technology to enhance what you’re already doing in the classroom.
My final piece of advice here really is to get yourself over to the Apple Teacher site and get yourself signed up on there using your Apple ID. Not only can you benchmark where you are at with your knowledge about teaching with technology but also learn how to use lots of the great, creative and innovative apps on your iPad in ways which can really impact learning. Once you’ve gone through that training too you can then complete the various tests to gain your Apple Teacher badge.
Good luck!
If you like this blog post and my ideas resonate with you, you can work with me to help with your use of technology in your school. Just drop me a line on my contact page to start the conversation. Here’s some recent feedback from the head of teaching and learning at a College I’ve been working with:
Mark really is excellent at inspiring teams to embrace digital tools in teaching and learning. Working in partnership with @ICTEvangelist and @BridgendCollege to become a digital college #BeExtraordinary https://t.co/Y7i2Q24uyI
— Carolyn Hayward (@TLBridgend) April 28, 2018