Apple Clips has landed and it does what all successful edtech does, it makes showing learning simple. It has a low entry point in terms of technical ability required to use it but is hugely scalable in terms of the depth of knowledge being shown as I’ll demonstrate later.
I can see how Apple Clips could fit in and work well in classrooms, particularly in Primary education where the pupils in the classrooms are so young they can’t access tools such as Adobe Spark Video. Alternatively, those schools who are well into using other tools like Puppet Edu or Explain Everything may wish to stick with those too.Despite sounding like I’m picking, there are some very nice features in the app, particularly the voice to text feature. This is a real strength and with the ability to edit any text that Siri doesn’t quite get right (such as the number four – or should I say ‘for’) it can be corrected to whatever you want [edit: I’ve updated this bit of my blog as it would appear you can edit the text, I originally thought you couldn’t – it can be done although not very clear. Thanks to Mat Pullen for the heads up!]. It does make you think carefully too when speaking and pronouncing words. This may be something that Language teachers may choose to zone in on as using Siri with foreign languages is a great way of practicing your pronunciation.
Use Apple Clips to explain a topic
Here is an example I made using Apple Clips to explain the product life-cycle:
I simply prepared my assets. The images at the start and end were made in Adobe Spark Post and I drew the Product Life-Cycle in Explain Everything. To be fair I could have done the same activity in Explain Everything but many schools don’t have Explain Everything because of the cost factor. Apple Clips is free.
Use Apple Clips to give feedback
Taking photographic evidence is simple using a mobile device in the classroom. With Apple Clips, why not quickly pop those photos into Apple Clips and then record your feedback over the top, annotating it if you want to.
Use Apple Clips to examine photos with historical significance
Simply dropping in the photos you want to examine and then using your fingers to pinch, pan and zoom around an image whilst talking is simple in Apple Clips. Here’s an example:
Apple Clips to explain the steps in a process
Apple Clips is super simple to use and using the techniques described above you can use it to explain all sorts of processes. From the steps in a Science experiment or baking a cake or simply preparing for a camping trip.
Use Apple Clips however you want
I’ve found it fits pretty well into my repertoire of apps. It does sit alongside apps such as Explain Everything and Adobe Spark Video too and can be used in very similar ways. Why would anyone choose to use Clips if they have EE or Spark Video? Well it is simple to use and it is free. It does get you nicely around the age restriction issue you face in Primary if you want to use Adobe Spark Video and if you haven’t got EE because of the price point, then you might want to try Apple Clips as the alternative. If you’re already using EE or Spark Video then you might not want to bother. I do think it sits in there nicely though and can give a learning return. I’m definitely going to keep it in my toolkit of apps.
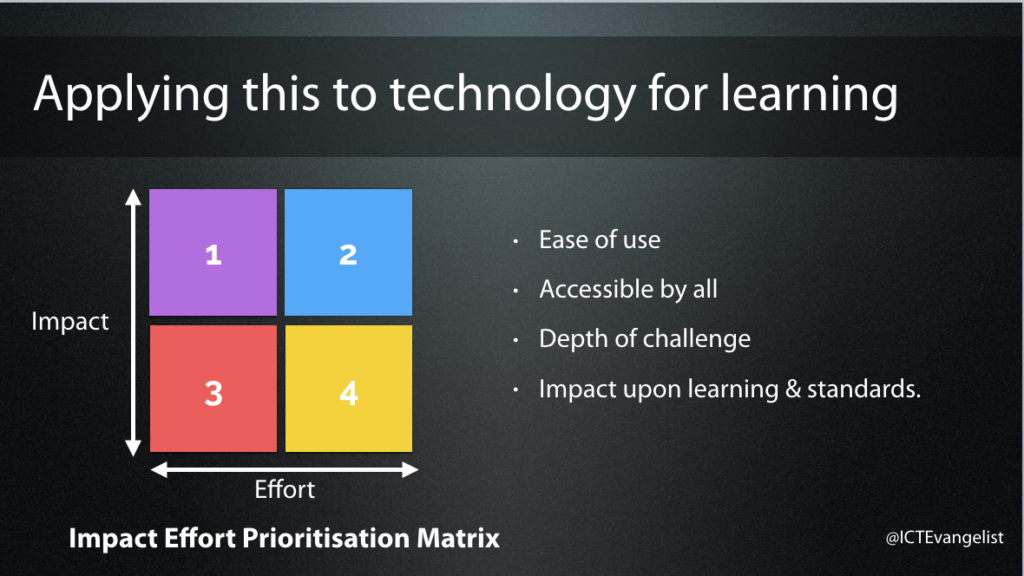
If we think about whether Apple Clips is worth using against this matrix, it is low effort and could be potentially high impact. It does, like most of these things, depend upon what you use it for. Is the time put in by you or your pupils in using it, worth the time? Are there other tools that do the job better?
It is easy to use and there can be considerable depth of challenge applied to tasks given to pupils to complete using the tool. By demonstrating knowledge, understanding, skills, evaluation, synthesis etc whilst using the tool creatively, I can see how this tool could impact upon learning and standards.
It is not however accessible to all if you have a multi-device strategy in your school. If you are BYOD, use Android or Microsoft devices, then this app isn’t for you. It is only available on iOS.
To finish off, here is my first attempt at using Apple Clips to explain the SAMR framework.
Enjoy!