A while ago I wrote a post which signalled a solid baseline level of ten things every teacher should be able to do with their iPad. It has been very popular and a recent resurgence in its popularity at the beginning of the academic year shows it is still just as relevant. That said, as teachers new to iPad schools start their learning journey with iPad it is essential that high-quality professional development is delivered to ensure that the best use of the device takes place.
Too often, professional development can focus on the cool things you can do with technology rather than the impactful and purposeful activities you can undertake. This is wrong. It is important that any CPD provided supports gaining value to both the school who has invested in the hardware but just as importantly, to the teachers and students who will be using it in their everyday work.
In this post, I will explore more features and tools available and how they can be used to enhance and develop your existing practice to help ensure the best value can be gained from the device.
One: Use text replacement
Productivity is important and taking on board the ideas of aggregated marginal gains, using the ‘text replacement tool’ on your iPad is a great way to help. There are a number of different things we often have to type, such as:
- email addresses
- web addresses
- feedback comments
- report comments
- instructions
- quotes
- search parameters
- hashtags
These can all be stored handily on your iPad so you can make them drop in as easily as it is remembering the key phrase in order to make it work.
An example of this was my old school email address. As with many school email addresses, it was pretty long. It went something like this:
m.anderson@ourschoolname.localauthorityname.sch.uk

That is quite a considerable email address. It takes about 20 – 30 seconds to type it. Using the text replacement tool I was able to shorten that to just “m.an” so that when I typed “m.an” and then pressed space, it would automatically drop in my email address.
You can do this too!
- Open Settings
- Go to General
- Go to Keyboards
- Choose Text Replacement
- Tap on the + icon
- Type in the long phrase and the shortcut you want to use
- Tap away
- Job done!
That shortcut will now work in every text-based app you have where you have the ability to enter text.
Two: Dictate!
By this, of course, I do not mean suddenly become a dictator in your classroom. I mean for you to use the dictation feature built directly into your iPad. Now, this isn’t a new addition to the device however I’m always still amazed that more teachers aren’t using this feature. The accuracy is really good and can really free you up to be more efficient, effective and active completing other tasks while your iPad types what it is that you say. I find a good way to do this is to leave my iPad on my desk, but connected to my wireless headphones. That way I can use dictation features but still be active whilst I’m dictating. As noted, Dictation has been around for some time as a feature however previously it required an internet connection if you now have an iPad Pro, Dictation is built-in without requiring the internet.
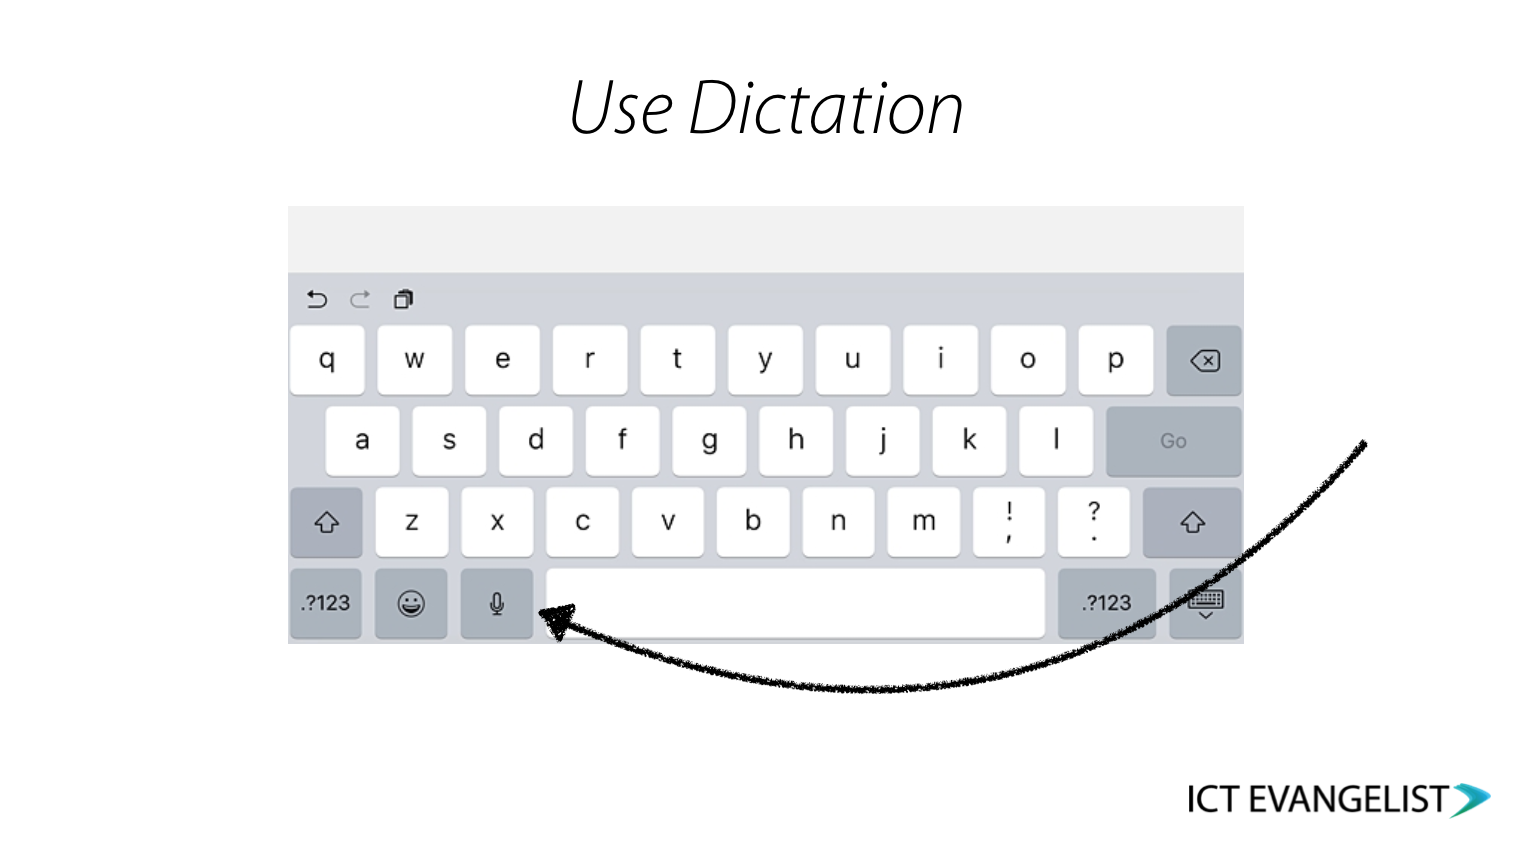
To start Dictation on your iPad simply press the microphone button on your keyboard, just left of the space bar.
Three: Long press!
That’s right. Long press! There are lots of contextual menus available in iOS and lots of apps have them too.

An example of this would be a long press on the Files App icon. This will bring up a menu showing the last 4 files you’ve had open, giving you quick access to files you’ve been working on recently.

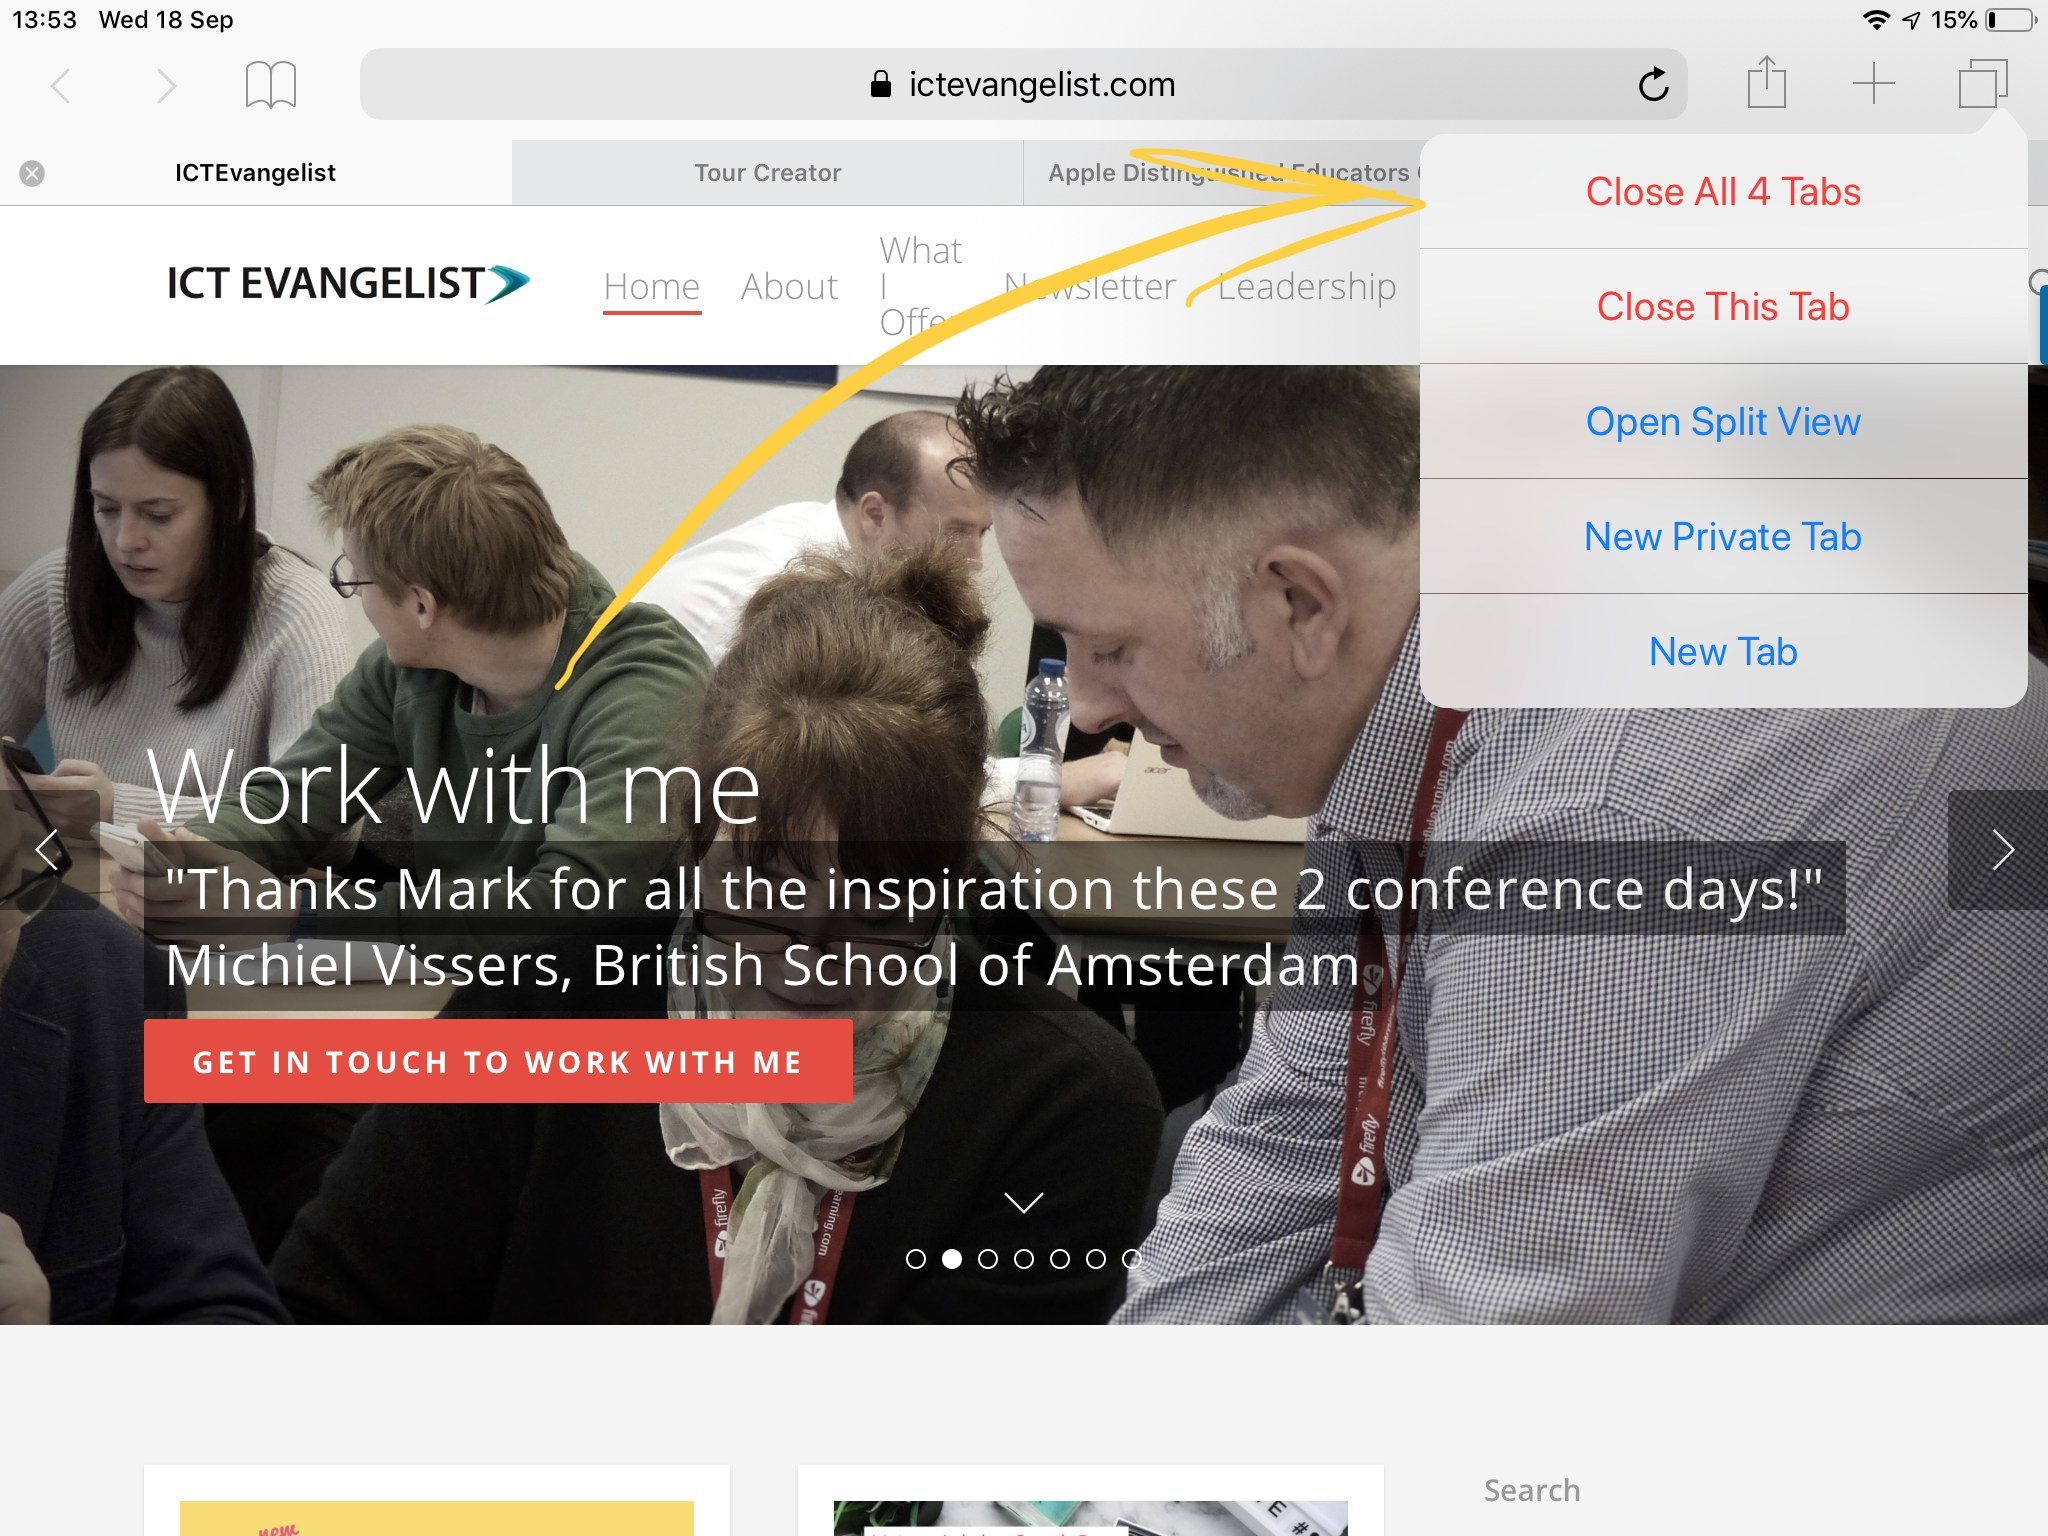
Another one could be the tab menu found in Safari. Long presses are available in lots of different apps and tools.
Another quick shortcut is to long press the icon of two squares at the top right in the Safari app on iPad or the bottom right on an iPhone. From here you can close all of the tabs you have open in Safari in one go rather than doing it one at a time. Just choose the option: “Close All Tabs”.
There are many more long presses to discover. If you find some good ones please do share in the comments. Unfortunately, the long press shortcuts aren’t easily signposted so often it can be a case of trying things out until you find ones that work for you.
Four: Find a word on a web page
Despite many blasting using Safari as a substitutional activity on the SAMR scale, being able to use a search engine well is a key skill for both educators and students alike. Having knowledge of Boolean operators, being able to use AND, OR, parentheses and quotation marks and combining Boolean searches and exact phrases are a great way of making the most of your search engine. Equally, it is important to be able to use your browser well. Part of that, especially when you are faced with a large document, is the ability to find the keywords that you are looking for on a page quickly and effectively, without the need to search through an entire document. When you’re using a laptop in your browser or even your iPad with a keyboard, it’s as easy as using “CMD/CTRL + F” to enter the search screen. Without a keyboard, however, it’s a little bit different.
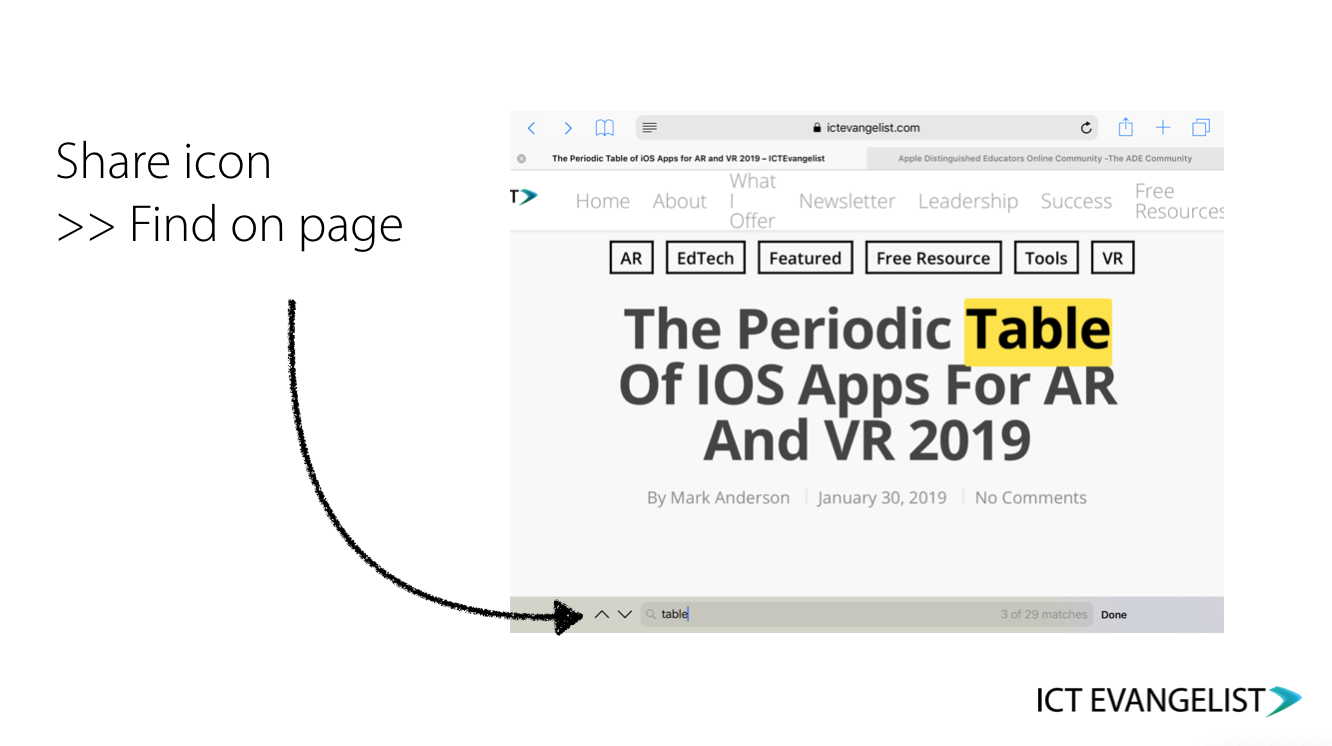
One way is to simply return to your address bar and type the keyword that you’re looking for which will then show you the different keywords you’re looking for.

A better way is to press the ‘share’ icon in Safari, swipe across until you find the option ‘Find On Page’ and tap on it. Once you have done this it is easy to type in the keyword you are looking for and use the arrows to scroll through to each occurrence of your keyword.
Five: Use the mouse!
One of my favourite features of iOS from the last few years has to be the mouse feature which kicks in and can be used via the keyboard on your iPad. To get it to work is really simple and there are two ways you can do it.
Space bar mouse
Simply long press on the space bar when the keyboard is up and this will bring up a mouse-like trackpad which you can then use to move the cursor around your text. Amazing!
Two-finger mouse
This requires you to simply press your keyboard with two fingers. This movement is a little more tricky to master as if you hold and press for too long then you will start highlighting your text. To get the cursor movement to work just press two fingers down lightly and move the cursor to the desired location.

This is how the keyboard will look once the mouse feature is enabled. Simply slide around the blank keyboard to move the cursor around.
Practice will help you to control this however, either way, it is a great feature and makes it exceedingly easy to edit text when proofreading after using the dictation feature to get your text inputted in the first place.
Six: Use Shortcuts
Not to be confused with the Shortcuts app (although I’ll be sharing about that in the next example), Siri works with lots of automated and suggested Shortcuts within iOS. You can set up a number of these directly from the Settings app:

Linked to lots of apps that you’ll have on your iPad such as:
- Safari
- Weather
- Photos
- Messages
- FaceTime
- Maps
… in Settings you can add lots of the suggested shortcuts to Siri so you can make these things happen super quick. For example, if you regularly want to view a specific album in Photos, you can add a Siri shortcut to that to make it happen straight away. If you want to regularly open a specific book in Books or Kindle app, you got it! There are many different ways that you can make this work in your favour.
Seven: Use the Shortcuts App!
Moving on from thinking about Siri Shortcuts as mentioned above, the Shortcuts app is a superb tool to help you automate lots of things that you do regularly using your iPad. A recent example of this that I shared on Twitter was when I used the shortcut that converts any video stored in the Photos app to an animated GIF – superb for sharing on digital signage, as part of a presentation or on social media. In my example, I had made a nice little animated video using Adobe Spark Post but wanted it as a GIF. I wrote about this process here.

There are many more Shortcuts you can use in the app The first step you’ll have to do is to download the Shortcuts app from the App Store. It’s free and you can grab it here and there are instructions on how to do this in this post.
The ‘Convert Video to GIF’ shortcut can be downloaded when you visit this page.
As you can see from this short GIF above, there are lots of different shortcuts that can be found and used to help automate and speed up lots of different activities you might undertake using your iPad. Here are five of my favourites:
Download file – simply run the shortcut, paste in the link to the file you want to download, choose its destination and then hey presto, your file will download
Intelligent power – this is a shortcut which will look at your current battery percentage, check it against any predefined settings you have and then tailor your iPad’s performance to squeeze as much battery power out of your battery that it can before it dies.
Check spelling – whether you like it or not, the auto spell checker doesn’t always get things right. With this shortcut, simply copy the text you want to check, run the shortcut, paste in your text and the shortcut will fix your typos for you right there and then. Handy!
Apple Notes Clipper – now you can send web pages, documents and all sorts of things to your notes via the share function, however, it doesn’t come with a text clipper. With this shortcut, simply copy the URL you wish to clip and run the shortcut. It’ll then visit the URL, grab the text, create a new note and put the text in. It’ll even add in information such as title, author, date written, and the source web address!
Social Media Downloader – first things, first – I do not advocate for downloading copyrighted material and I’m sure you don’t either. That said, there will be times when you want to, let’s say – access a video from Twitter or YouTube, for argument’s sake, for you to use offline. If it is permissible to do so without breaking any copyright, using this shortcut, you can do just that. Simply install the shortcut, find the resource in Safari, go to the Share option and choose the shortcut. It will give you a few options to follow and will then save the media you chose to your Photos app.
There are many many more shortcuts available to you and I’m sure you’ll have your favourites too. Please do share them in the comments section below. There is also an active and creative shortcut community on Reddit where you’ll find all manner of superb shortcuts to help automate tasks you might want. For example, one I found recently is for use if pulled over by the police. If it happens, all you need to do is say, ‘Hey Siri, I’m getting pulled over” and the shortcut will automatically:
- Pause your music
- Turn the brightness down
- Activate Do Not Disturb
- Start recording using the front-facing camera
The shortcut will even (if you tell it to) send that video to a pre-designated contact in your contacts.
Eight: Use Split View, Slide Over and Drag and Drop
The Split View feature on iOS is super helpful. It allows you to see your iPad in lots of different ways. One way I find quite useful is to have the ‘Slide Over’ feature working where I can have a document open (for example in Pages) but have another app open, e.g. Twitter
To do this is really easy. Simply:
- Have Pages open
- Swipe up gently to bring up the Dock
- On the Dock, simply press and hold the second app, such as Twitter, that you want to open and just drag it on to your screen
You can also use the Split View option to work with two apps open simultaneously. An example of this might be when you’re composing an email and want to view photos you might want to include in the email. You can also then drag and drop items from one app to the other, e.g. drag a photo from the Photos app directly into your email. Do this simply by:
- Opening your app
- Swipe up from the bottom of the screen to bring up the Dock
- On the Dock, touch and hold the second app that you want to open, then drag it off the dock.
- When the app opens in Slide Over, you’ll notice an icon at the top of the window that looks like a small straight horizontal line. Simply tap on it and drag it down. This will then put the second app into Split View.
As you can see from the short video above, it really is a quick and simple thing to do and just one more feature of iOS that helps you to be that little bit more productive!
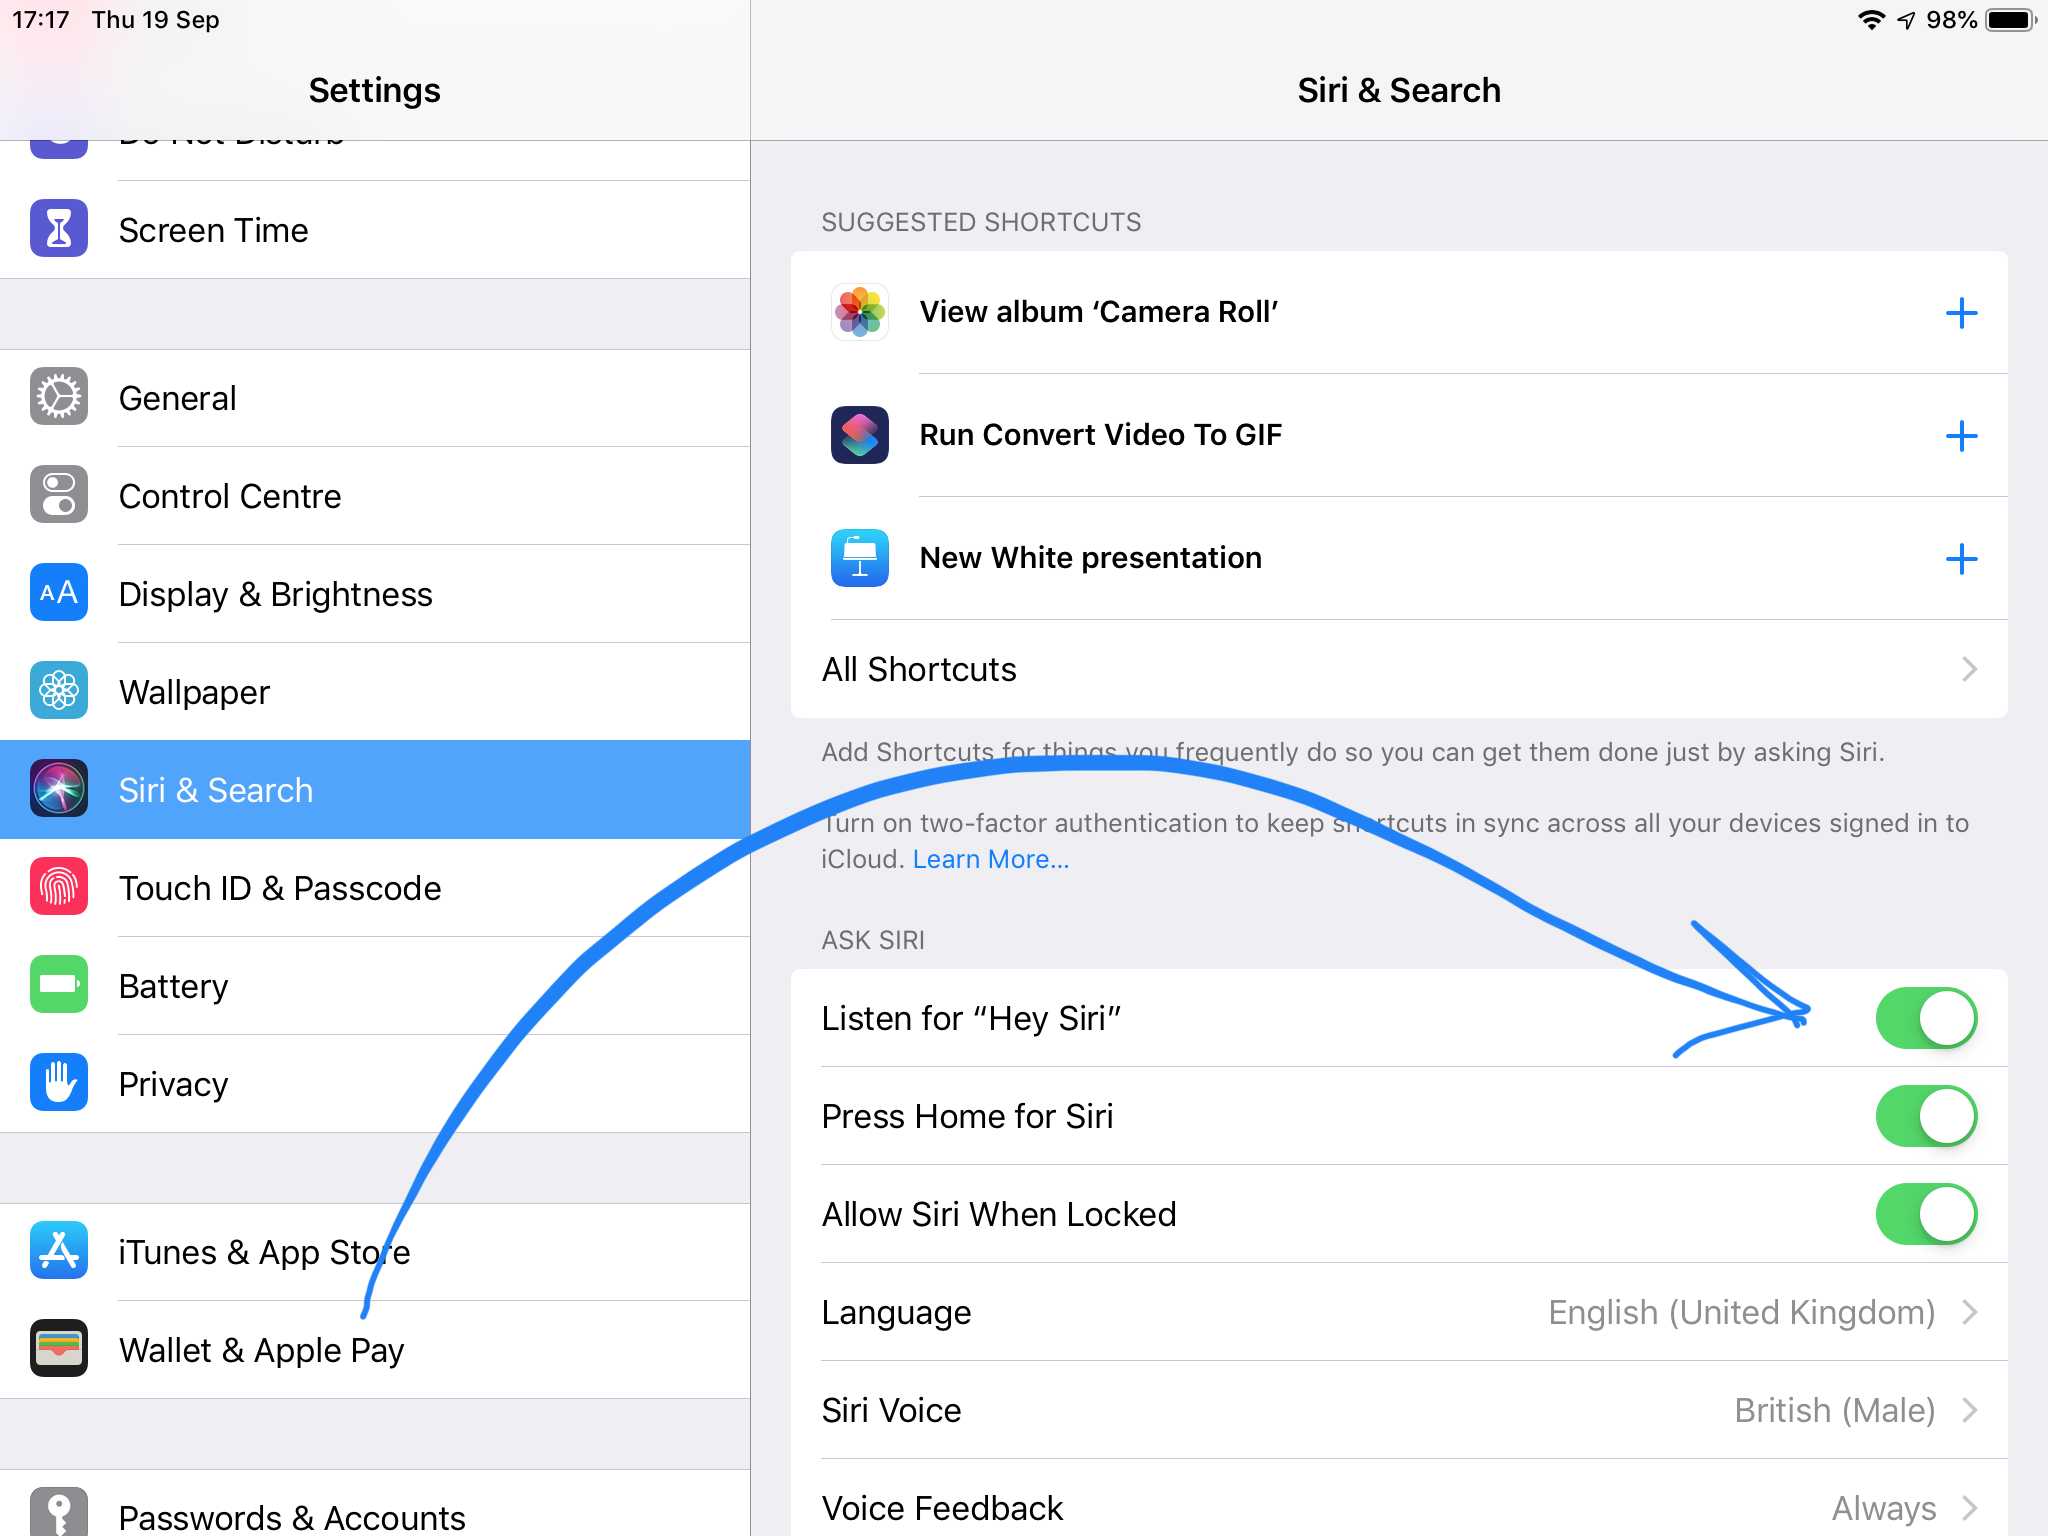
Nine: Use Siri More!
We all know Siri, right? So why not use it to help you complete more tasks and make you even more efficient. The first recommendation would be to head over to Settings and go to the Siri section. Here, make sure you check the box that says to ‘Listen for “Hey Siri”.
Apart from the classic Easter Eggs such as asking Siri to Beatbox or to divide zero by zero, Siri is a super-helpful bit of built-in AI to iOS to make our lives a bit easier. For example:
- Hey Siri, set an alarm for….
- Hey Siri, set a timer for….
- Hey Siri, what is 455 x 23?
- Hey Siri, what song is playing now?
- Hey Siri, open Keynote
- Hey Siri, send an email to…
- Hey Siri, remind me tomorrow morning to…
- Hey Siri, change the pronunciation…
There are many ways in which you can use Siri to help you with your day to day work. It can become even more powerful when you link it to the Shortcuts app and create your own Siri Shortcuts to enable you to use Siri to automate tasks that you perform on a regular basis. The opportunities and different things you can set up within Siri are endless!
Ten: Get yourself over to Apple Teacher
If you’re sitting here reading this and thinking “oooooh I didn’t know you could do that?“, why not head over to the Apple Teacher centre where you will find (and it’s recently been updated) more than 75 different (free) professional development and training opportunities to help you get the most out of your iPad for your classroom.

What’s more, once there, you can complete different training activities to help you gain your Apple Teacher badge! Simply head over to appleteacher.apple.com and login with your Apple ID and get started!
Of course, many schools and colleges want a bit more hands-on support with all of this.
Work With Me
If you’ve enjoyed this post and think that my approaches to using technology to support the activities of teachers and students would be of benefit to you or colleagues, please do get in touch to see how I can work with you to make the most of teaching and learning with technology in your school.