Many schools are embracing the use of iPad in education, with class packs, in 1:1 models but some aren’t. What if you’re one of those teachers though that wants to use an iPad in your classroom. What if there’s the possibility of using just one in your classroom, is there any use? Well of course there is. The iPad is such a versatile device it can be used in this way to great effect in a number of different scenarios. Let’s be clear, if you were to ask me what the best model would be, I will always say 1:1, of course, getting a device in to the hands of every student is the best way to improve learning possibilities, especially in lessons where you plan their use in in a transformational way via SAMR thinking about ‘Critical Pedagogy’. That said, these ideas can also have a big effect on helping to transform learning in your lessons.
Go!
One of the most overlooked features of an iPad is actually one of its most useful. Having the iPad as a research device in your lesson can be really helpful. Load up Safari and the WWW is your oyster. If you want to direct groups of students to specific bits of research or online information too, why not pop some pre-created QR codes on to your wall which link to the information you want students to read / watch / listen to at specific stages in the lesson?
QR code idea posts:
https://ictevangelist.com/?p=994
http://deeplearning.edublogs.org/2012/08/02/qr-codes-and-documenting-brilliant-learning/
Learning spies
David Didau was savvy when he nabbed the learning spy moniker, but we can take on board the idea of learning spies in our lessons in lots of different ways using an iPad. You don’t have to use the same students every lesson, but observing the learning process, recording it, sharing it, helps with learning in its own way too. Students could:
- Create an immersive 360 degree video or images from your lesson with a Bubblescope and the free Bubblepix app
- Record the learning process with videos – put it then in to iMovie and annotate it live to then upload to the class YouTube/Vimeo account for students to access any time
- Record the lesson with notes, photos, audio recordings straight in to Evernote and save in to the class notebook in the shared Evernote account?
- Take photos and show the stages of learning using the £0.69 Diptic app. That picture could then be added in to Skitch and annotated and shared with the class during the lesson and uploaded to the class Evernote account or Dropbox folder.
- Live blog the lesson using Twitter, CoverItLive, WordPress, Blogger, Blogsy – add some of the pictures, notes, references from the lesson on to the class blog.
- Interview students using voice recorders such as Audioboo, iPadio or the superb SoundCloud.
- Get groups of students to work together to demonstrate their learning on a class radio station on a site such as Podomatic
- Get students to use the (£6.99) iThoughts HD app to mind map learning in the class. The mind map could be organised in groups for the different groups in the class, they could be organised by individual, by phase of the lesson. Given that the mind map can easily have photos inserted too and easily shared to Evernote / Dropbox, the opportunities here for demonstrating learning are big too.
Showcase
The ability to mirror your iPad to your whiteboard in the classroom opens up lots of extra possibilities. If you have an iPad in your classroom, there are number of ways you can connect to your projector.
Option 1: Wired.
Buy a wire to connect. Pros, cheap, cons, you’re tethered by a lead about 5 inches in length. Recommended? Not at all.
Option 2: Wireless
There are a number of wireless options. You can link across wifi to a device called an ‘Apple TV’ (circa £80 ex VAT). This involves a number of pieces of kit.
Option 2a:
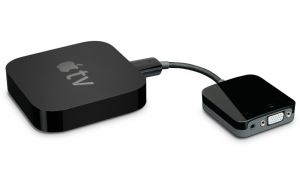
Firstly, you need to know that the Apple TV has HDMI outputs and most projectors in schools don’t. Therefore you need to convert that signal in order for the Apple TV to push to your projector. A device such as the Kanex ATV Pro (£59.99) facilitates this as shown here:
The lead leaves the Kanex ATV then and goes straight to your projector via a VGA lead and you can then project your iPad and Apple TV on your screen. There is a small 3.5mm headphone port on the Kanex device too which will enable you to get audio; great if you’re presenting anything with sound. Just connect your speakers.
This solution still needs you to think in more detail though. Chances are, that in your teaching room, you have a PC or other device that you want to show on your screen too, probably quite often. You don’t want to be chopping and changing your leads in your lesson. You have enough to be doing without pulling out and sorting lots of wires. This is where a splitter will help. I’m not going to go in to great detail here as this isn’t what this post is about, but suffice to say, there is a way that you can project and quickly/easily switch between a PC/Mac and your iPad in the classroom using this method.
Option 2b:
This method takes on board your existing PC/Mac in your classroom and involves mirroring via that machine. If it’s a Mac it’s likely it will have wireless built in, and, if it’s a newish device, it will have iPad mirroring built in within the recent updates to the Mac operating system. If you haven’t though – the Reflection app will enable you to link your iPad, directly to your PC/Mac (and a wireless dongle if your machine doesn’t have wireless built in) and straight to your machine. The App can be downloaded from HERE and is $14.99 for a single licence.
Projecting your iPad
If you’re projecting your iPad, you can use it to show anything that you’re doing. This, in the one iPad classroom, is a simply awesome enhancement. Not only can you show anything you have open; a presentation in Keynote, an annotated GPS linked map, a video, a website, a piece of music, a book, so forth and so on, but taking on board the camera you have on the iPad, it can help these two massively engaging uses of the device:
- Videoconferencing – do this via built in Facetime or Skype with any other Facetime/Skype user, IN THE WORLD
- Visualiser – use the iPad as a visualiser. If you’re demonstrating a micro skill why not, rather than get the entire class to crowd around you not seeing what you’re really doing, get one student to show it on the iPad to the whole class in the built in Camera app? This could also be recorded, added later in to iMovie and annotated and published as a resource. Alternatively, the AirPresenter app can be used to show live stream from your iPad but that image can also be annotated. Check this and imagine that it’s your classroom in the background with the writing on. It’s great.
If you have any thoughts on using the iPad in the classroom I would be very interested to hear them. Please comment below or contact me on twitter @ICTEvangelist
Further reading:
iPad as >> Excellent post http://edtechteacher.org/index.php/teaching-technology/mobile-technology-apps/ipad-as


I’m keen in my role to make T and L more innovative and exciting for pupils, both in the classroom and beyond. Although we already have a great learning culture we want an ethos of collaborative learning for both staff and pupils alike. This blog has supported my thinking on this Sunday morning! I have downloaded 15 new free apps (yes free! no dent in the school budget) which I think will support us moving further towards a learning organisation. The blog links to lots of other blogs, tweets and work which were really helpful. Thank you. I will keep you updated with the impact.