I was alerted to this great tool the other week by the great Doug Belshaw when he made this presentation here: http://dougbelshaw.com/presentations/2012/eskills/index.html#/ – this web based presentation has a number of key benefits to it. For starters, it’s really really simple to use, particularly if you use the web based creation tool found here: http://www.rvl.io/.
Getting started
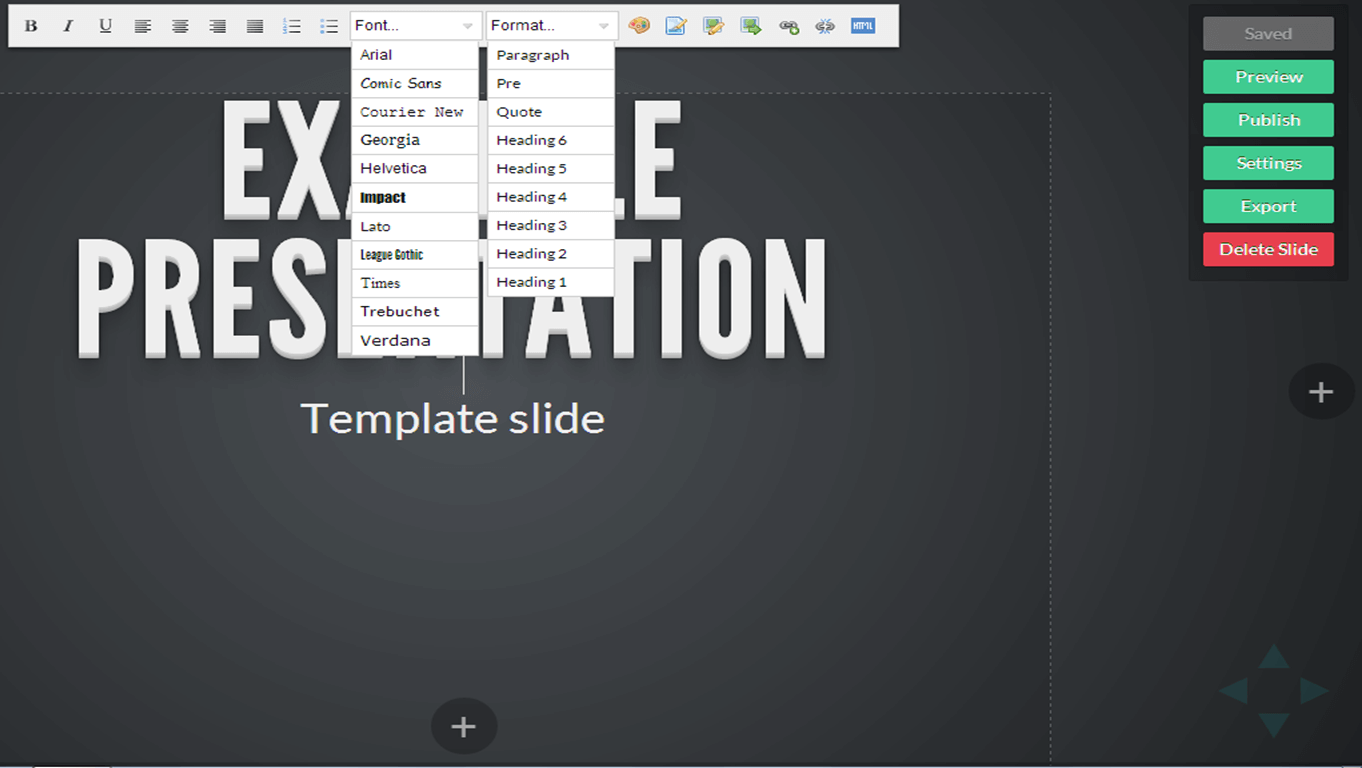
Single sign on is supported so you can use your existing Google, OpenID, Yahoo or AOL account. Once in, you simply create a new deck, give your presentation a name and you’re presented with a number of options via the toolbar.
Formatting
Looking like most text editor tools, you can simply type in to your slide and add in the media you may want with it too. Font choices, formatting, sizes, colours, alignments and more mean you can lay out your information simply and beautifully. Remember the golden rule of presentations too where less is more. When you’re ready, start a new slide with the plus symbol.
Adding new slides
One of the things I like most about the tool is that you can nest similar themes in vertical slides (down) before moving horizontally (to the right) to the next theme within your presentation. You can see this in my presentation from TeachMeet Clevedon here on SAMR and transformational use of technology to support learning: http://www.rvl.io/ictevangelist/transforming-learning-using-technology
Adding images
Interestingly too, adding images is a simple process too, either add them in by uploading the local versions of the image or simply link to where the image you want to use is hosted online.
Embedding YouTube
I’ve also worked out that you can embed YouTube videos in to your slides too. To do this, I got the embed link from YouTube. Clicked the HTML icon on the slide toolbar. Pasted in the embed code. Job done.
Finished?
When you’re done, simply tap the publish button and you can access your presentation from the generated URL. Alternatively, if you want to do as Doug as done, just choose Export, download the completed presentation folder and put it on to your online hosting space. Interestingly, this also works if you want to just run it from your local machine. Just remember, because the presentation is built using web architectures and tools such as Javascript, you will need all of the files in the presentation folder in order for it to work. For the simplest way to work it, just leave it saved in your deck on the rv.lio website and access all of your presentations in one place.
iPad/iPhone?
Thanks to @mattbritland for checking. Making a presentation on your iPad or iPhone is possible but you can’t really add images plus making links isn’t easy. Recommendation? Make your presentation using a different device, ie laptop/desktop. All that said, showing your presentation on your phone or your iPad looks seriously slick. All you have to do is swipe your finger over the slide in the direction you want to move to next and you’re away.
Map view in iOS
You can also zoom out and see your presentation in map view, which is always handy before starting your presentation to remind you where to go, but also nice at the end to remind viewers where they’ve been. To access this simply pinch with your fingers. Tap back on a slide to zoom back in.
Extras?
To move through your slides, simply use the cursor / arrow keys to navigate through your slides. Interestingly, it also works with clickers, so it’s a great way of presenting without having to stand near your machine to move through every slide.
Happy presenting!








One Comment